
zip-up hoodie
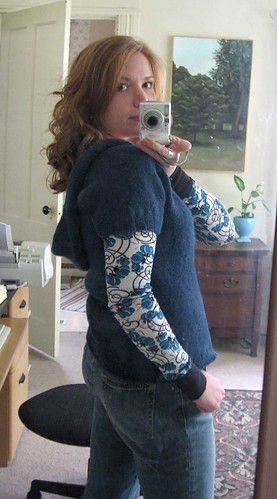
 Finally, after two months in the making, my hoodie is finished! This project took quite a bit longer than I intended, mostly because my initial "plan" was pretty weak.
I incorporated bits and pieces from about 4 different free patterns to create my zippered hoodie. (Maybe I should have called it the Frankenstein Hoodie or something, but I've never been good at giving titles to things.) I've never had much interest in creating patterns, but necessity is the mother of invention and I needed a hoodie fix. After an impatient 20 minutes of surfing the internet, I couldn't find a pattern I liked. But I found something that I thought might get me started, since I wanted to cast on for the hoodie like, now, and didn't want to have to think about it too much. (Maybe I should call it the My Laziness Knows No Bounds Hoodie.) I took what I needed from these patterns and tossed the rest. When a pattern ceased to meet my needs, I found another to pull from and kept right on knitting. I took the garment off the needles several times to make sure I was on the right track. Of course, the great thing about top-down sweaters is that you can try them on as you go, and adjust your knitting when necessary. Ok, there was some math, but not much. With all the cutting and pasting I did, I don't know if that actually makes this conglomeration my design or my pattern or whatever, but I don't mind telling you how I got here...since some of you asked. (Although I can't imagine why!) But this is NOT a pattern. Not even close. I guess "tutorial" would be a more appropriate term. Feel free to use what you can from this tutorial and toss the rest!
 I used 800 yards of worsted weight yarn and size 8, 32" circular needles. I didn't check my gauge because I just figured I'd try it on as I went, but it worked out to about 6 st/1".
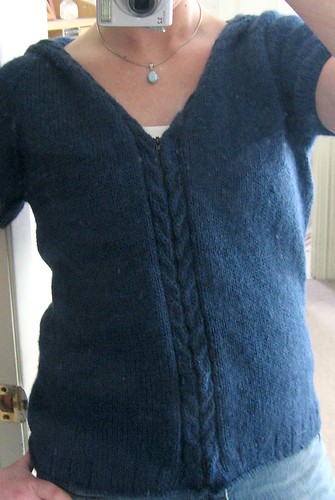
I only did one garter stitch on the very edges of my work all the way through the pattern. This was probably a mistake, as I had hardly anything to attach to the zipper, and had to sew it in by hand. I'm not sure what a better solution would be, since I wanted to make sure that the cables would meet in the middle, so it's something to be aware of. It came out looking nice, and the zipper keeps the edges from rolling in (the cable on the hood still rolls in), but it was a pain in the neck.
CO 86 st.
Set up row: k1, p2, k4, p2, k 2, pm, k 14, pm, k 36, pm, k 14, pm, k2, p2, k4, p2, k1.
You will be working basic cables on either end of your work. I cabled forward on one side and cabled back on the other side, so that the cables would wrap inward toward each other. I worked the cables every 6 rows throughout the pattern, although they probably could have been worked every 4 rows.
Working (mostly) in St st, increase on both sides of sleeve markers using kbf increases, as you would for any top-down raglan, remembering to work the 8 st cable panel at each end of your work, and the one lonely garter stitch on each end, if you so choose.
At the same time, increase on front edges of hoodie by doing m1 increases next to the cable panel (so that the cable panel remains at the very end of each row) every 4th row until the front pieces of the cardigan are wide enough to meet in the middle. I think it took me 81 rows to make the cardigan close in front, but I've got some extra room in there (heh, as usual).
After you have enough stitches to allow the sleeves to meet under the arm and the cables to meet in front, put the sleeve stitches on scarp yarn and continue to work the rest of the body.
After working 3" from under the arm, I began decreasing. I did some good old fashioned math to figure out how many stitches I needed to decrease and how often. Make sure you place markers in what would be the center of the sides of the hoodie. Knit to 3 st before marker, then ssk, k1, sl m, k1, k2tog on each side. I decreased every 5th row 4 times, then worked 1" even. I then began increasing by knitting to 1 st before marker, m1, k1, sl m, k1, m1, in order to mirror the shaping in the top half.
 Knit the body to the desired length, including 1.5" of ribbing, then BO. I used 4x1 ribbing, but I'm not sure that it's quite sturdy enough to keep the bottom edge from rolling. I might have used 3x1 ribbing instead.
Using dpn's, knit the sleeves to desired length, including ribbing, BO.
Pick up the 86 stitches along the neck for the hood. I worked even in stockinette (aside from the cable panel) to 11". When working the cable panel, notice that you'll have to switch the forward and backward cables. On the body you were working top-down, now you're working bottom-up. Just make sure it looks right. After knitting 11" I found the center of the hood to place a marker, and decreased 2 stitches in the center of the hood on each RS row 14 times by knitting to 3 st before marker, ssk, k1, sl m, k1, k2tog.
Either graft the top of the hood together or bind off and seam. I tried to graft the top of the hood, but it came out more like a seam, which was fine by me.
I blocked, then installed the zipper (El Diablito).
If you do attempt this tutorial, please remember that it should have a giant disclaimer attached to it all about how I actually have no idea what I'm doing and that you should knit at your own risk. Enjoy!
posted by jenna at 7:23 AM
![]()


28 Comments:
That's a whole lot of self-effacing blogging when you have an absolutely fabulous FO to show for it!
My first design was a sort of amalgam of several patterns too. It was a real confidence builder to realize that design doesn't have to be that hard!
Congrats.
Yay, I've been dying to see this, and it looks fantastic! I still have a ways to go before I start designing my own stuff, but this is very inspirational. Looks great on you too. Do people tell you you look like Scarlett Johansson? :o)
great job - i have done that in the past also - start out with one pattern and keep moving to new ones until you're done! Frankenstein hoodie is a great and appropriate name! it turned out great!!!
When I saw the picture in flickr, I was wondering what the pattern was - how cool that you took all these different elements and came up with something so great looking!
wow, i love it! turned out great for having totally winged it ;)
Wow!! Great job on the hoodie! Me likey! I have 880 yards of some worsted weight....hmmmm
can you stop being so amazing you're making us all feel dweeby squee!! it's fantastic. you tamed the diablito. and you look so cuuuteeeeee. : ) !!!!!!!!!! i just wanna poke you.
So, SO cute!! And you completely hit upon my weakness... hoods! Thanks for sharing all of your info; I have a feeling this one will be popping up again in blogland... and in my knitting basket. Did I say so cute? I meant SOOOOOOO cute!!
So cute! And I love the long sleeved shirt taht you are wearing with it.
Very very nice! You shouldn't be so hard on your method - it worked! I can definitely appreciate the desire to cast on right away!
It's really cute! I'm definitely bookmarking this post.
Your hoodie looks great! I like the cable hiding the zipper...that was a great idea. Thanks for the hints on how to knit one up. :)
Adorable - don't knock it, you did a GREAT job :) And I would definitely say it's a Knits & Pieces orginal, I get the impression that most designs are combinations/modifications of existing ideas or patterns. Congrats!
That's very cute indeed! Love those front cable panels too... very good job. :) And thanks so much for your notes on it.
That is fantastic. So cool! Great job on the fit too.
Wow! Great job! It looks great on you!
That is really really cute. I am loving the zipper and the hood. Great job!
NICE JOB!! Thanks for all your notes.
It's super cute! Very inspiring!
Love the short sleeves. SO cute with a contrasting patterned shirt underneath. Good job!
that is a super cute hoodie! It is your pattern at this point :) I love the way the neck looks, and the short sleeves. Great job on the finishing; it looks really nice and comfy!
Wow, that is such a great idea with the cables meeting at the zipper.
It looks so cute and the color looks beautiful with your hair!
Congratulations!!!!
It looks awesome. You say this isn't a 'pattern' because it's more a guideline in spots I guess, but I'm starting to think that this is the best way to go about knitting a sweater anyway. Using a pattern, or patterns, loosely, and tailoring them to what you really want and not being afraid to frog if necessary. It makes the difference between knitting someone else's idea that may or may not look good on you, and tailoring a handmade garment that fits perfectly. Congrats, it looks great!
wow, love it. really practical and wearable yet fashion forward. (did i just type fashion forward?) you shouldn't be so modest!
I love it! Bravo! The color is awsome and I love the short sleeved hoodie!
Love this....and how you came about to get this!!! Great job, and thanks for sharing! :)
l.o.v.e. i want one.
love the short sleeve hoodie !! good job.!
Post a Comment
<< Home